The difference between 600D Oxford cloth and 7-layer non-woven RV cover
RV covers are essential for protecting your recreational vehicle (RV) from various environmental elements and keeping it in good condition. The choice between a 600D Oxford Fabric RV cover and a 7-layer non-woven fabric RV cover depends on your specific needs and preferences. Let's compare these two types of RV covers:
Material Composition:
600D Oxford Fabric RV Cover: This type of cover is made from 600-denier Oxford fabric. It's a type of woven fabric known for its durability and resistance to wear and tear. It is often coated with a waterproof or water-resistant layer for added protection.
7-Layer Non-Woven Fabric RV Cover: A 7-layer non-woven fabric RV cover typically consists of multiple layers of non-woven materials, such as polypropylene, designed to provide a high level of protection against UV rays, moisture, and other environmental factors.
Durability:
600D Oxford Fabric RV Cover: Oxford fabric is known for its robustness, making it highly durable and resistant to abrasion. It can withstand the rigors of outdoor use and is less prone to tears and punctures.
7-Layer Non-Woven Fabric RV Cover: Non-woven fabrics can also be durable, but their durability may vary depending on the specific materials used in the layers. Some non-woven covers are designed to be exceptionally sturdy.
Water Resistance:
600D Oxford Fabric RV Cover: Oxford fabric can be water-resistant, especially when it's treated with a waterproof coating. However, the level of water resistance may vary between different brands and models.
7-Layer Non-Woven Fabric RV Cover: Many non-woven fabric RV covers are designed to be waterproof or highly water-resistant due to the multiple layers and treatments applied.
Breathability:
600D Oxford Fabric RV Cover: Oxford fabric is generally less breathable compared to some non-woven materials. This can be a factor to consider if you want to prevent moisture buildup under the cover.
7-Layer Non-Woven Fabric RV Cover: Some non-woven covers are designed to be breathable, allowing moisture to escape, which can help prevent mold and mildew growth.
UV Protection:
600D Oxford Fabric RV Cover: Oxford fabric may offer decent UV protection, but this can vary depending on the specific brand and coating.
7-Layer Non-Woven Fabric RV Cover: Many non-woven covers are designed to provide excellent UV protection to prevent sun damage to your RV's exterior.
Weight and Ease of Handling:
600D Oxford Fabric RV Cover: Oxford fabric covers tend to be heavier and may require more effort to install and remove.
7-Layer Non-Woven Fabric RV Cover: Non-woven fabric covers are often lighter and more manageable during installation and removal.
Ultimately, the choice between a 600D Oxford Fabric RV cover and a 7-layer non-woven fabric RV cover depends on your priorities, such as durability, water resistance, breathability, and UV protection. Consider your specific climate, storage conditions, and how often you plan to use the cover when making your decision. Additionally, reading product reviews and consulting with RVMasking customer service can help you find the right cover for your needs.
Carry bag to fit the cover is great. Nice that it comes ready to install and not having to lay it out and turn over.
People who bought this product also bought
Description
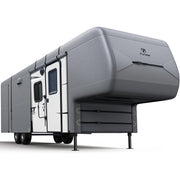
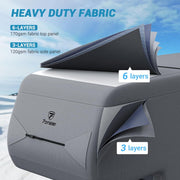
- ✅【Anti-UV & Tear-resistant】 Anti-UV composition was improved from 3% to 4%, providing extra 25% anti-UV performance to avoid fabric disintegration by sun. Newly 6 layers top fabric plus 3 layers side fabric design is much heavy duty and tearing-resistant than most cover in the market. Fonzier fifth wheel camper cover serves your RVs maximum protection against rain, snow and sunlight, thereby reduce the premature aging of RVs and help maintain resale value.
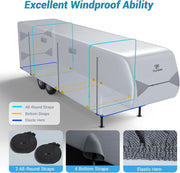
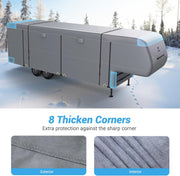
- ✅【Wind-Proof & Snugly Fit】 2PCS extra long straps, adjustable front and rear tension panel, and elasticized hem corners help you resist the wind better and provide you a custom-like fit. Undercarriage strap system -8 straps and buckles- are more anti-aging than the outsides. Gutter spout cover and double Fabric reinforcement in 8 corners reduce the tearing caused by sharp corner in storm.
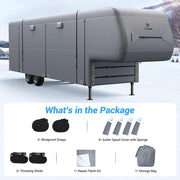
- ✅【Easy Installation】 Each kits arrive ready to install and includes: 2 toss mental stick help you tie the bottom straps that go from one side to the other beneath the RV easily; 4 gutter spout covers with sponge inside protect your cover from the sharp gutter. Plus, the front and rear reflective strip design for safety and avoid collision during night.
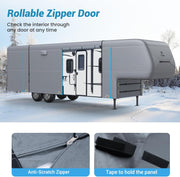
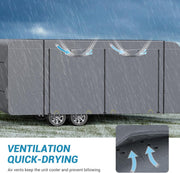
- ✅【Great Ventilation & Accessibility】 4 Air vent keep unit cooler and prevent billowing in windy day. 3 zipper constitute 2 zipper door at passenger side panel. Just roll up the zipper panel then you can check the internal situation at anytime. Plus, we added padding under the zippers, so you don’t have to worry that the zipper will scratch your RV.
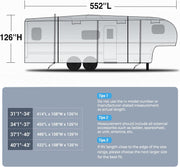
- ✅【Accessories】Fits for 37'1''-40' fifth wheel camper. Package: 5th wheel cover*1, all-round long straps*2, gutter spout cover*4, 11’×11’ adhesive repair patch*1, toss mental stick*2, storage bag*1. We offer a 24-month warranty to our customer. If you have any question or suggestion, please feel free to contact us.


Shipping
Shipping Locations
RVMasking provides free delivery service only in the United States. Not available for sale outside the United States.
Shipping Fees
If your location belongs to remote areas, the resulting remote costs borne by the buyer. (Customer service specialists will contact before shipping)
We only support PayPal and Credit Card payment (Visa, Mastercard, Discover, etc). All our products are shipped free of charge, so the user only has to bear the cost of the product and no extra charges will be incurred.
Shipping Carrier
FedEx、USPS、UPS、Amazon Logistics
Processing and Delivery Time
- Processing Time: Usually 1-2 Business Days. (Except holidays)
- Shipping Time: Usually 2-5 Business Days. (Ships from our overseas warehouse in the USA)
Orders during Saturday and Sunday will be processed as quickly as possible on Monday. It may take longer process to process and deliver your orde during peak seasons. We sincerely appreciate your understading and patience.
Affected by Covid-19, the arrival time will be delayed(If you do not receive the goods for more than 15 days, please contact us by email at Support@rv-masking.com in time, we will compensate according to the product logistics)
Track Your Orders
When your order is dispatched we'll send you an email with your tracking details so you can follow its journey. If for any reason you don't receive this, please email us at Support@rv-masking.com and we'll update you on your order's progress.
Contact Us Any Time
You are welcome to email us at Support@rv-masking.com any time if you need any help with your order.
Warranty
Install
① RV Cover Installation Guide
Step 1: Put the tire cover on first. Slide the cover over the tire, took the bungee to one side, toss around the back of the tire and connect it to the other side.
Step 2: Find a nice large area to spread the cover, unfold it. Find the front and back of the cover. (The side with sewn "front" tag, that's the front)
Step 3: Flip the cover and make sure the top is facing upward. Fold over one side of the top, the other side of the top, from the bottom loosely roll up the cover toward the front.
Step 4: Take the cover to the top and put it on.(Tips: remember to make your roof clean with no twigs branches)
Step 5: Put the gutter cover on and drop one side of the cover, over the front and back. The other side is the same. Make sure all folds are out and equally space side to side.
Step 6: Put all the staps tight (including triangle straps, medium traps, and large straps)
You are so welcome to email us at Support@rv-masking.com if any help is needed.
② Boat Cover Installation Guide
Place cover over the front portion of your boat. Then pull cover slowly over the vehicle until it covers the boat. (Remember: Avoid any sharp corners as you install the cover. You may wish to pad sharp angles or tape them over with a piece of material before covering.)
Trailering With Your RVMasking Cover
- Place the long black strap through the belt sheath sewn on the cover back. Attach the strap ends into the special non-corrosive buckle. You can adjust the length of the strap using the buckle.
- Then secure the elastic cord under the middle belly of the boat or pwc.
- Then cinch up all straps tightly, so as to keep the wind from tearing the cover off when you drive. (Warning: When transporting, cover must be fastened in such a way as to eliminate "Wind Flap". Improper installation or failure to tighten the belts & straps, may cause the cover to tear.)
STRAPS: Buckles that face down will tie to each other going under. to opposite side. The buckles that face up will tie over the cover to opposite sides. The straps will wrap the entire boat going under the hull and over the boat cover refund meeting at the rub rails to connect to the buckles.
Cleaning Your Cover
Any cover will slowly collect dust on its underside, picked up from contact with the surface of the vehicle. Do not use machines with agitators - this can damage the cover and actually cause rips or tears. Do not wash in hot water! DO NOT put the cover in an automatic dryer (the fabric can melt). DO NOT dry clean. Another way to clean the dust from either the inside or outside of the cover is to put it on the vehicle and hose it off. To clean the inside, put the cover on the vehicle inside out(this can only be done if you do not have an external antenna). After rinsing off the cover, leave it on the vehicle to dry. Then fold it and return it to the trunk or usual storage place.
Installing Cover With Loops & Tie Down Straps :
Based upon the size of your boat cover, it may not be necessary to use all of the tie down straps.
- Step 1: Thread the buckle-end of the strap through the tie down loop from back to front. Pull through approximately 12 inches and tie-off with a simple overhand knot so that the strap is secure.
- Step 2: Guide the opposite end of the strap around the trailer from back to front.
- Step 3: Thread the strap through the top slot in the quick release buckle from back to front, pulling the end of the strap toward you.
- Step 4: Continue threading the strap over the center bar of the buckle and into the bottom slot of the buckle. The strap is now fully adjustable by pulling down on the loose end of webbing. Install all the straps on the cover before tightening.
- Step 5: Be sure the cover is centered on the boat, then tighten all straps securely so that the cover is taut.
- Step 6: Trim the straps. Leave approximately 12” of webbing for adjustability and trim off any excess using a pair of scissors. Lightly singe the cut edge of the webbing using a cigarette lighter to fuse the yarns and prevent the webbing from unraveling.
DO NOT SET ON FIRE AND BE SURE TO EXTINGUISH ANY FLAMES. To remove the boat cover, simply disconnect the quick release buckles by squeezing the sides. For quick and easy re-installation of the cover, leave the straps attached to the tie-down loops. After first use, check straps for tautness. If they require adjustment, untie knot and refer to step 1.
③ Car Cover Installation Guide
STEP 1: Make sure your vehicle is clear of any dust or dirt particles, so they do not get trapped in between the cover and your vehicle surface.
STEP 2: Carefully remove your RVMasking Cover from the carrying case on the top of your vehicle with the front of the cover facing the front of your vehicle, being careful it does not touch the ground. We suggest beginning towards the rear of your vehicle.
STEP 3: Slowly unroll the cover down the middle of the vehicle towards the back and cover the rear of the car making sure the edge of the cover is under the bumper.
STEP 4: Now, roll the front of the cover towards the hood of your vehicle unrolling the side as you move forward. Do the same for the other side of your vehicle.
STEP 5: Pull the front edge of the cover underneath your front bumper. Adjust the cover where needed to ensure that all areas are covered.
STEP 6: Use the strap and buckle clips, or cable lock system underneath your vehicle to secure the cover and ensure that it does not move around or get blown away. Adjust where necessary.
Reviews
Carry bag to fit the cover is great. Nice that it comes ready to install and not having to lay it out and turn over.


